“Hello everyone! ”
Shiro简介
Shiro是Apache下的一个开源项目,我们称之为Apache Shiro。它是一个很易用与Java项目的的安全框架,提供了认证、授权、加密、会话管理,与Spring Security 一样都是做一个权限的安全框架,但是与Spring Security 相比,在于 Shiro 使用了比较简单易懂易于使用的授权方式。Shiro属于轻量级框架,相对于Security简单的多,也没有Security那么复杂。所以我这里也是简单介绍一下Shiro的使用。
非常简单;其基本功能点如下图所示:
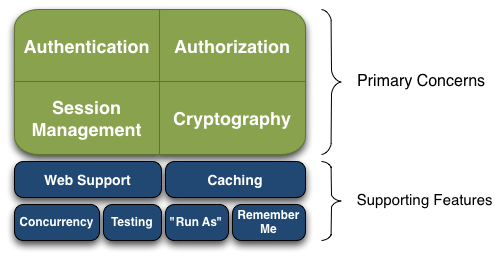
Authentication:身份认证/登录,验证用户是不是拥有相应的身份;
Authorization:授权,即权限验证,验证某个已认证的用户是否拥有某个权限;即判断用户是否能做事情,常见的如:验证某个用户是否拥有某个角色。或者细粒度的验证某个用户对某个资源是否具有某个权限;
Session Manager:会话管理,即用户登录后就是一次会话,在没有退出之前,它的所有信息都在会话中;会话可以是普通JavaSE环境的,也可以是如Web环境的;
Cryptography:加密,保护数据的安全性,如密码加密存储到数据库,而不是明文存储;
Web Support:Web支持,可以非常容易的集成到Web环境;
Caching:缓存,比如用户登录后,其用户信息、拥有的角色/权限不必每次去查,这样可以提高效率;
Concurrency:shiro支持多线程应用的并发验证,即如在一个线程中开启另一个线程,能把权限自动传播过去;
Testing:提供测试支持;
Run As:允许一个用户假装为另一个用户(如果他们允许)的身份进行访问;
Remember Me:记住我,这个是非常常见的功能,即一次登录后,下次再来的话不用登录了。
记住一点,Shiro不会去维护用户、维护权限;这些需要我们自己去设计/提供;然后通过相应的接口注入给Shiro即可。
第一步: 新建SpringBoot项目
右键工程->创建Project->选择spring initialir->Web-Web,Template Engines-Thymeleaf,SQl-JPA/Mysql/JDBC/MyBatis,然后一直下一步就行了。
创建完成后加入Shiro支持和自动生产数据访问文件:
1
2
3
4
5
6
7
8
9
10
11
12
13
14
15
16
17
18
19
20
21
22
23
24
25
26
27
28
29
30
31
32
33
34
35
36
37
38
39
40
41
42
43
44
45
46
47
48
49
50
51
52
53
54
55
56
57
58
59
60
61
62
63
64
65
66
67
68
69
70
71
72
73
74
75
76
77
78
79
80
81
82
83
84
85
86
87
88
89
90
91
92
93
94
95
96
97
98
99
100
101
<?xml version="1.0" encoding="UTF-8"?>
<project xmlns="http://maven.apache.org/POM/4.0.0" xmlns:xsi="http://www.w3.org/2001/XMLSchema-instance"
         xsi:schemaLocation="http://maven.apache.org/POM/4.0.0 http://maven.apache.org/xsd/maven-4.0.0.xsd">
    <modelVersion>4.0.0</modelVersion>
    <parent>
        <groupId>org.springframework.boot</groupId>
        <artifactId>spring-boot-starter-parent</artifactId>
        <version>2.1.3.RELEASE</version>
        <relativePath/> <!-- lookup parent from repository -->
    </parent>
    <groupId>com.shiro</groupId>
    <artifactId>manager</artifactId>
    <version>0.0.1-SNAPSHOT</version>
    <name>manager</name>
    <description>Demo project for Spring Boot</description>

    <properties>
        <java.version>1.8</java.version>
    </properties>

    <dependencies>
        <dependency>
            <groupId>org.springframework.boot</groupId>
            <artifactId>spring-boot-starter-data-jpa</artifactId>
        </dependency>
        <dependency>
            <groupId>org.springframework.boot</groupId>
            <artifactId>spring-boot-starter-jdbc</artifactId>
        </dependency>
        <dependency>
            <groupId>org.springframework.boot</groupId>
            <artifactId>spring-boot-starter-web</artifactId>
        </dependency>
        <!-- 支持html访问 -->
        <dependency>
            <groupId>org.springframework.boot</groupId>
            <artifactId>spring-boot-starter-thymeleaf</artifactId>
        </dependency>
        <dependency>
            <groupId>org.mybatis.spring.boot</groupId>
            <artifactId>mybatis-spring-boot-starter</artifactId>
            <version>2.0.0</version>
        </dependency>
        <dependency>
            <groupId>org.apache.shiro</groupId>
            <artifactId>shiro-spring</artifactId>
            <version>1.4.0</version>
        </dependency>
        <dependency>
            <groupId>com.alibaba</groupId>
            <artifactId>druid</artifactId>
            <version>1.1.15</version>
        </dependency>
        <dependency>
            <groupId>org.mybatis.generator</groupId>
            <artifactId>mybatis-generator-core</artifactId>
            <version>1.3.7</version>
        </dependency>
        <dependency>
            <groupId>mysql</groupId>
            <artifactId>mysql-connector-java</artifactId>
            <scope>runtime</scope>
        </dependency>
        <dependency>
            <groupId>org.springframework.boot</groupId>
            <artifactId>spring-boot-starter-test</artifactId>
            <scope>test</scope>
        </dependency>
    </dependencies>

    <build>
        <plugins>
            <plugin>
                <groupId>org.springframework.boot</groupId>
                <artifactId>spring-boot-maven-plugin</artifactId>
            </plugin>
            <!--添加mybatis generator maven插件-->
            <plugin>
                <groupId>org.mybatis.generator</groupId>
                <artifactId>mybatis-generator-maven-plugin</artifactId>
                <version>1.3.5</version>
                <configuration>
                    <!--generatorConfig.xml位置-->
                    <configurationFile>src/main/resources/generatorConfig.xml</configurationFile>
                    <verbose>true</verbose>
                    <overwrite>true</overwrite>
                </configuration>
                <executions>
                    <execution>
                        <id>Generate MyBatis Artifacts</id>
                        <goals>
                            <goal>generate</goal>
                        </goals>
                        <phase>generate-sources</phase>
                    </execution>
                </executions>
            </plugin>
        </plugins>
    </build>

</project>
配置appication.yml文件:
1
2
3
4
5
6
7
8
9
10
11
12
13
14
15
16
17
18
19
server:
  port: 8082
spring:
  datasource:
    driver-class-name: com.mysql.jdbc.Driver
    url: jdbc:mysql://localhost:3306/spring_shiro?useUnicode=true&characterEncoding=utf8
    username: root
    password: lijun520
  jpa:
    show-sql: true
    hibernate:
      ddl-auto: update
  http:
    encoding:
      charset: utf-8
      enabled: true
mybatis:
  mapper-locations: classpath:mapper/*Mapper.xml
  type-aliases-package: com.shiro.manager.entity
配置数据库表和数据文件:
1
2
已上传至工程目录的resources文件夹下面。
自动生产访问数据文件是generatorConfig.xml
第二步:配置ShiroRealm类
1
2
3
4
5
6
7
8
9
10
11
12
13
14
15
16
17
18
19
20
21
22
23
24
25
26
27
28
29
30
31
32
33
34
35
36
37
38
39
40
41
42
43
44
45
46
47
48
49
50
51
52
53
54
55
56
57
58
59
60
61
62
63
64
65
66
67
68
69
70
71
72
73
74
75
76
package com.shiro.manager.config;

import com.shiro.manager.dto.RoleDto;
import com.shiro.manager.dto.UserDto;
import com.shiro.manager.entity.AuthEntity;
import com.shiro.manager.service.LoginService;
import org.apache.shiro.authc.AuthenticationException;
import org.apache.shiro.authc.AuthenticationInfo;
import org.apache.shiro.authc.AuthenticationToken;
import org.apache.shiro.authc.DisabledAccountException;
import org.apache.shiro.authc.IncorrectCredentialsException;
import org.apache.shiro.authc.LockedAccountException;
import org.apache.shiro.authc.SimpleAuthenticationInfo;
import org.apache.shiro.authz.AuthorizationInfo;
import org.apache.shiro.authz.SimpleAuthorizationInfo;
import org.apache.shiro.realm.AuthorizingRealm;
import org.apache.shiro.subject.PrincipalCollection;
import org.springframework.beans.factory.annotation.Autowired;

public class ShiroRealm extends AuthorizingRealm {

    //用户查询
    @Autowired
    private LoginService loginService;

    //角色权限和对应的权限添加
    @Override
    protected AuthorizationInfo doGetAuthorizationInfo(PrincipalCollection principalCollection) {
        System.out.println("--------权限配置-------");
        //获取登录用户名
        String account = (String) principalCollection.getPrimaryPrincipal();

        //查询用户名
        UserDto userDto = loginService.findByAccount(account);

        SimpleAuthorizationInfo simpleAuthorizationInfo = new SimpleAuthorizationInfo();

        for (RoleDto roleDto:userDto.getRoleDtos()){
            //添加角色
            simpleAuthorizationInfo.addRole(roleDto.getRoleName());

            //添加权限
            for (AuthEntity authEntity:roleDto.getAuthEntities()) {
                simpleAuthorizationInfo.addStringPermission(authEntity.getPermission());
            }
        }
        return simpleAuthorizationInfo;
    }

    //用户认证
    @Override
    protected AuthenticationInfo doGetAuthenticationInfo(AuthenticationToken authenticationToken) throws AuthenticationException {
        //加这一步的目的是在Post请求的时候会先进认证,然后在到请求
        if (authenticationToken.getPrincipal() == null) {
            return null;
        }

        //获取用户信息
        String name = authenticationToken.getPrincipal().toString();

        String password = new String((char[]) authenticationToken.getCredentials());
        UserDto userDto = loginService.findByAccount(name);
        if (userDto == null) {
            return null;
        } else if (!password.equals(userDto.getPassword())) {
            throw new IncorrectCredentialsException();
        } else if (userDto.getState() == 0) {
            throw new DisabledAccountException();
        } else if (userDto.getState() == 2) {
            throw new LockedAccountException();
        } else {
            SimpleAuthenticationInfo simpleAuthorizationInfo = new SimpleAuthenticationInfo(name, userDto.getPassword(), getName());
            return simpleAuthorizationInfo;
        }
    }
}
第三步 配置ShiroConfiguration类
1
2
3
4
5
6
7
8
9
10
11
12
13
14
15
16
17
18
19
20
21
22
23
24
25
26
27
28
29
30
31
32
33
34
35
36
37
38
39
40
41
42
43
44
45
46
47
48
49
50
51
52
53
54
55
56
57
58
package com.shiro.manager.config;

import org.apache.shiro.mgt.SecurityManager;
import org.apache.shiro.spring.security.interceptor.AuthorizationAttributeSourceAdvisor;
import org.apache.shiro.spring.web.ShiroFilterFactoryBean;
import org.apache.shiro.web.mgt.DefaultWebSecurityManager;
import org.springframework.context.annotation.Bean;
import org.springframework.context.annotation.Configuration;

import java.util.HashMap;
import java.util.Map;

@Configuration
public class ShiroConfiguration {

    ////将自己的验证方式加入容器
    @Bean
    public ShiroRealm shiroRealm() {
        ShiroRealm shiroRealm = new ShiroRealm();
        return shiroRealm;
    }

    //权限管理,配置主要是Realm的管理认证
    @Bean
    public SecurityManager securityManager() {
        DefaultWebSecurityManager securityManager = new DefaultWebSecurityManager();
        securityManager.setRealm(shiroRealm());
        return  securityManager;
    }

    //filter工厂,设置对应的过滤条件和跳转条件
    @Bean
    public ShiroFilterFactoryBean shiroFilterFactoryBean(SecurityManager securityManager){
        ShiroFilterFactoryBean shiroFilterFactoryBean = new ShiroFilterFactoryBean();
        shiroFilterFactoryBean.setSecurityManager(securityManager);
        Map<String,String> map = new HashMap<>();
        //登出
        map.put("/logout","logout");
        //对所有用户认证
        map.put("/**","authc");
        //登陆
        shiroFilterFactoryBean.setLoginUrl("/login");
        //首页
        shiroFilterFactoryBean.setSuccessUrl("/index");
        //出错
        shiroFilterFactoryBean.setUnauthorizedUrl("/error");
        shiroFilterFactoryBean.setFilterChainDefinitionMap(map);
        return shiroFilterFactoryBean;
    }

    //加入注解的使用
    @Bean
    public AuthorizationAttributeSourceAdvisor authorizationAttributeSourceAdvisor(SecurityManager securityManager){
        AuthorizationAttributeSourceAdvisor authorizationAttributeSourceAdvisor = new AuthorizationAttributeSourceAdvisor();
        authorizationAttributeSourceAdvisor.setSecurityManager(securityManager);
        return authorizationAttributeSourceAdvisor;
    }
}
第四步: 配置访问类
1
2
3
4
5
6
7
8
9
10
11
12
13
14
15
16
17
18
19
20
21
22
23
24
25
26
27
28
29
30
31
32
33
34
35
36
37
38
39
40
41
42
43
44
45
46
47
48
49
50
51
52
53
54
55
56
57
58
59
60
61
62
63
64
65
66
67
68
69
70
71
72
73
74
75
76
77
78
79
80
81
82
83
package com.shiro.manager.controller;

import org.apache.shiro.SecurityUtils;
import org.apache.shiro.authc.UsernamePasswordToken;
import org.apache.shiro.authz.annotation.RequiresPermissions;
import org.apache.shiro.subject.Subject;
import org.springframework.stereotype.Controller;
import org.springframework.web.bind.annotation.RequestBody;
import org.springframework.web.bind.annotation.RequestMapping;
import org.springframework.web.bind.annotation.RequestMethod;

import java.util.Map;

@RequestMapping
@Controller
public class LoginController {

    //用于进入login页面
    @RequestMapping(value = "/login", method = RequestMethod.GET)
    public String login(){
        return "login.html";
    }

    //登陆时用post请求
    @RequestMapping(value = "/login", method = RequestMethod.POST)
    public String login(@RequestBody Map map){
        //添加用户认证信息
        Subject subject = SecurityUtils.getSubject();
        UsernamePasswordToken usernamePasswordToken = new UsernamePasswordToken(
                map.get("account").toString(),
                map.get("password").toString());
        //进行验证
        subject.login(usernamePasswordToken);
        return "login.html";
    }

    //进入首页
    @RequestMapping(value = "/index")
    public String index(){
        return "index.html";
    }

    //登出
    @RequestMapping(value = "/logout")
    public String logout(){
        return "login.html";
    }

    //错误页面
    @RequestMapping(value = "/error", method = RequestMethod.POST)
    public String error(){
        return "error.html";
    }

    //用户列表 用户必须拥有userInfo权限
    @RequiresPermissions("userInfo")
    @RequestMapping(value = "/userInfo")
    public String userInfo(){
        return "userInfo.html";
    }

    //用户新增 用户必须拥有userInfoAdd权限
    @RequiresPermissions("userInfoAdd")
    @RequestMapping(value = "/userInfoAdd")
    public String userInfoAdd(){
        return "userInfoAdd.html";
    }

    //用户删除 用户必须拥有userInfoDel权限
    @RequiresPermissions("userInfoDel")
    @RequestMapping(value = "/userInfoDel")
    public String userInfoDel(){
        return "userInfoDel.html";
    }

    //用户更新 用户必须拥有userInfoUpd权限
    @RequiresPermissions("userInfoUpd")
    @RequestMapping(value = "/userInfoUpd")
    public String userInfoUpd(){
        return "userInfoUpd.html";
    }

}
注:这里省略了service层和mapper层,需要的可以去看原工程代码。
第五步: 访问
访问http://localhost:8082/userInfo,你会发现此时会自动跳转到登陆页面,然后输入账户admin和密码123456, 登陆后进入index页面,然后访问http://localhost:8082/userInfo,此时可以正常访问,当然你也可以访问其他几个页面, 然后切换不同的账户,访问页面,会出现不同的结果。
源码下载:
https://github.com/mochengyanliu/Study/tree/master/manager